使用docker容器技术部署gitlab runner

要使用docker-compose文件部署GitLab Runner,你可以按照以下步骤操作:

1
2
sudo mkdir -p /opt/store/gitlab-runner
docker pull registry.cn-hangzhou.aliyuncs.com/misaka-open/gitlab-runner:alpine3.18
  1. 创建docker-compose.yml文件
    创建一个名为docker-compose.yml的文件,并添加以下内容:

    1
    2
    3
    4
    5
    6
    7
    8
    9
    version: '3.8'
    services:
    gitlab-runner:
    image: registry.cn-hangzhou.aliyuncs.com/misaka-open/gitlab-runner:alpine3.18
    container_name: "gitlab-runner"
    restart: always
    volumes:
    - '/opt/store/gitlab-runner:/etc/gitlab-runner'
    - '/var/run/docker.sock:/var/run/docker.sock' # 这个挂载是将宿主机上的docker socket挂载到了容器内,这样容器内执行的docker命令会被宿主机docker daemon最终执行

    在这个文件中,我们定义了一个名为gitlab-runner的服务,使用的是gitlab/gitlab-runner:latest镜像,并设置了卷挂载,以便GitLab Runner可以访问宿主机的Docker socket,从而能够执行Docker命令。

  2. 启动服务
    完成docker-compose.yml文件的编写后,使用以下命令来启动服务:

    1
    docker-compose up -d

    image-20241220210654105

    这个命令将会启动GitLab Runner服务,并且以后台模式运行。你可以使用docker ps命令来验证服务是否已经成功启动。

  3. 注册GitLab Runner
    启动GitLab Runner容器后,你需要注册Runner。进入容器内部,执行注册命令:

    1
    docker exec -it gitlab-runner gitlab-ci-multi-runner register

    按照提示输入GitLab实例的URL、注册token、Runner描述、标签等信息。对于执行器(executor),选择docker

    1
    2
    3
    4
    5
    6
    7
    8
    9
    10
    11
    12
    13
    Enter the GitLab instance URL (for example, https://gitlab.com/):
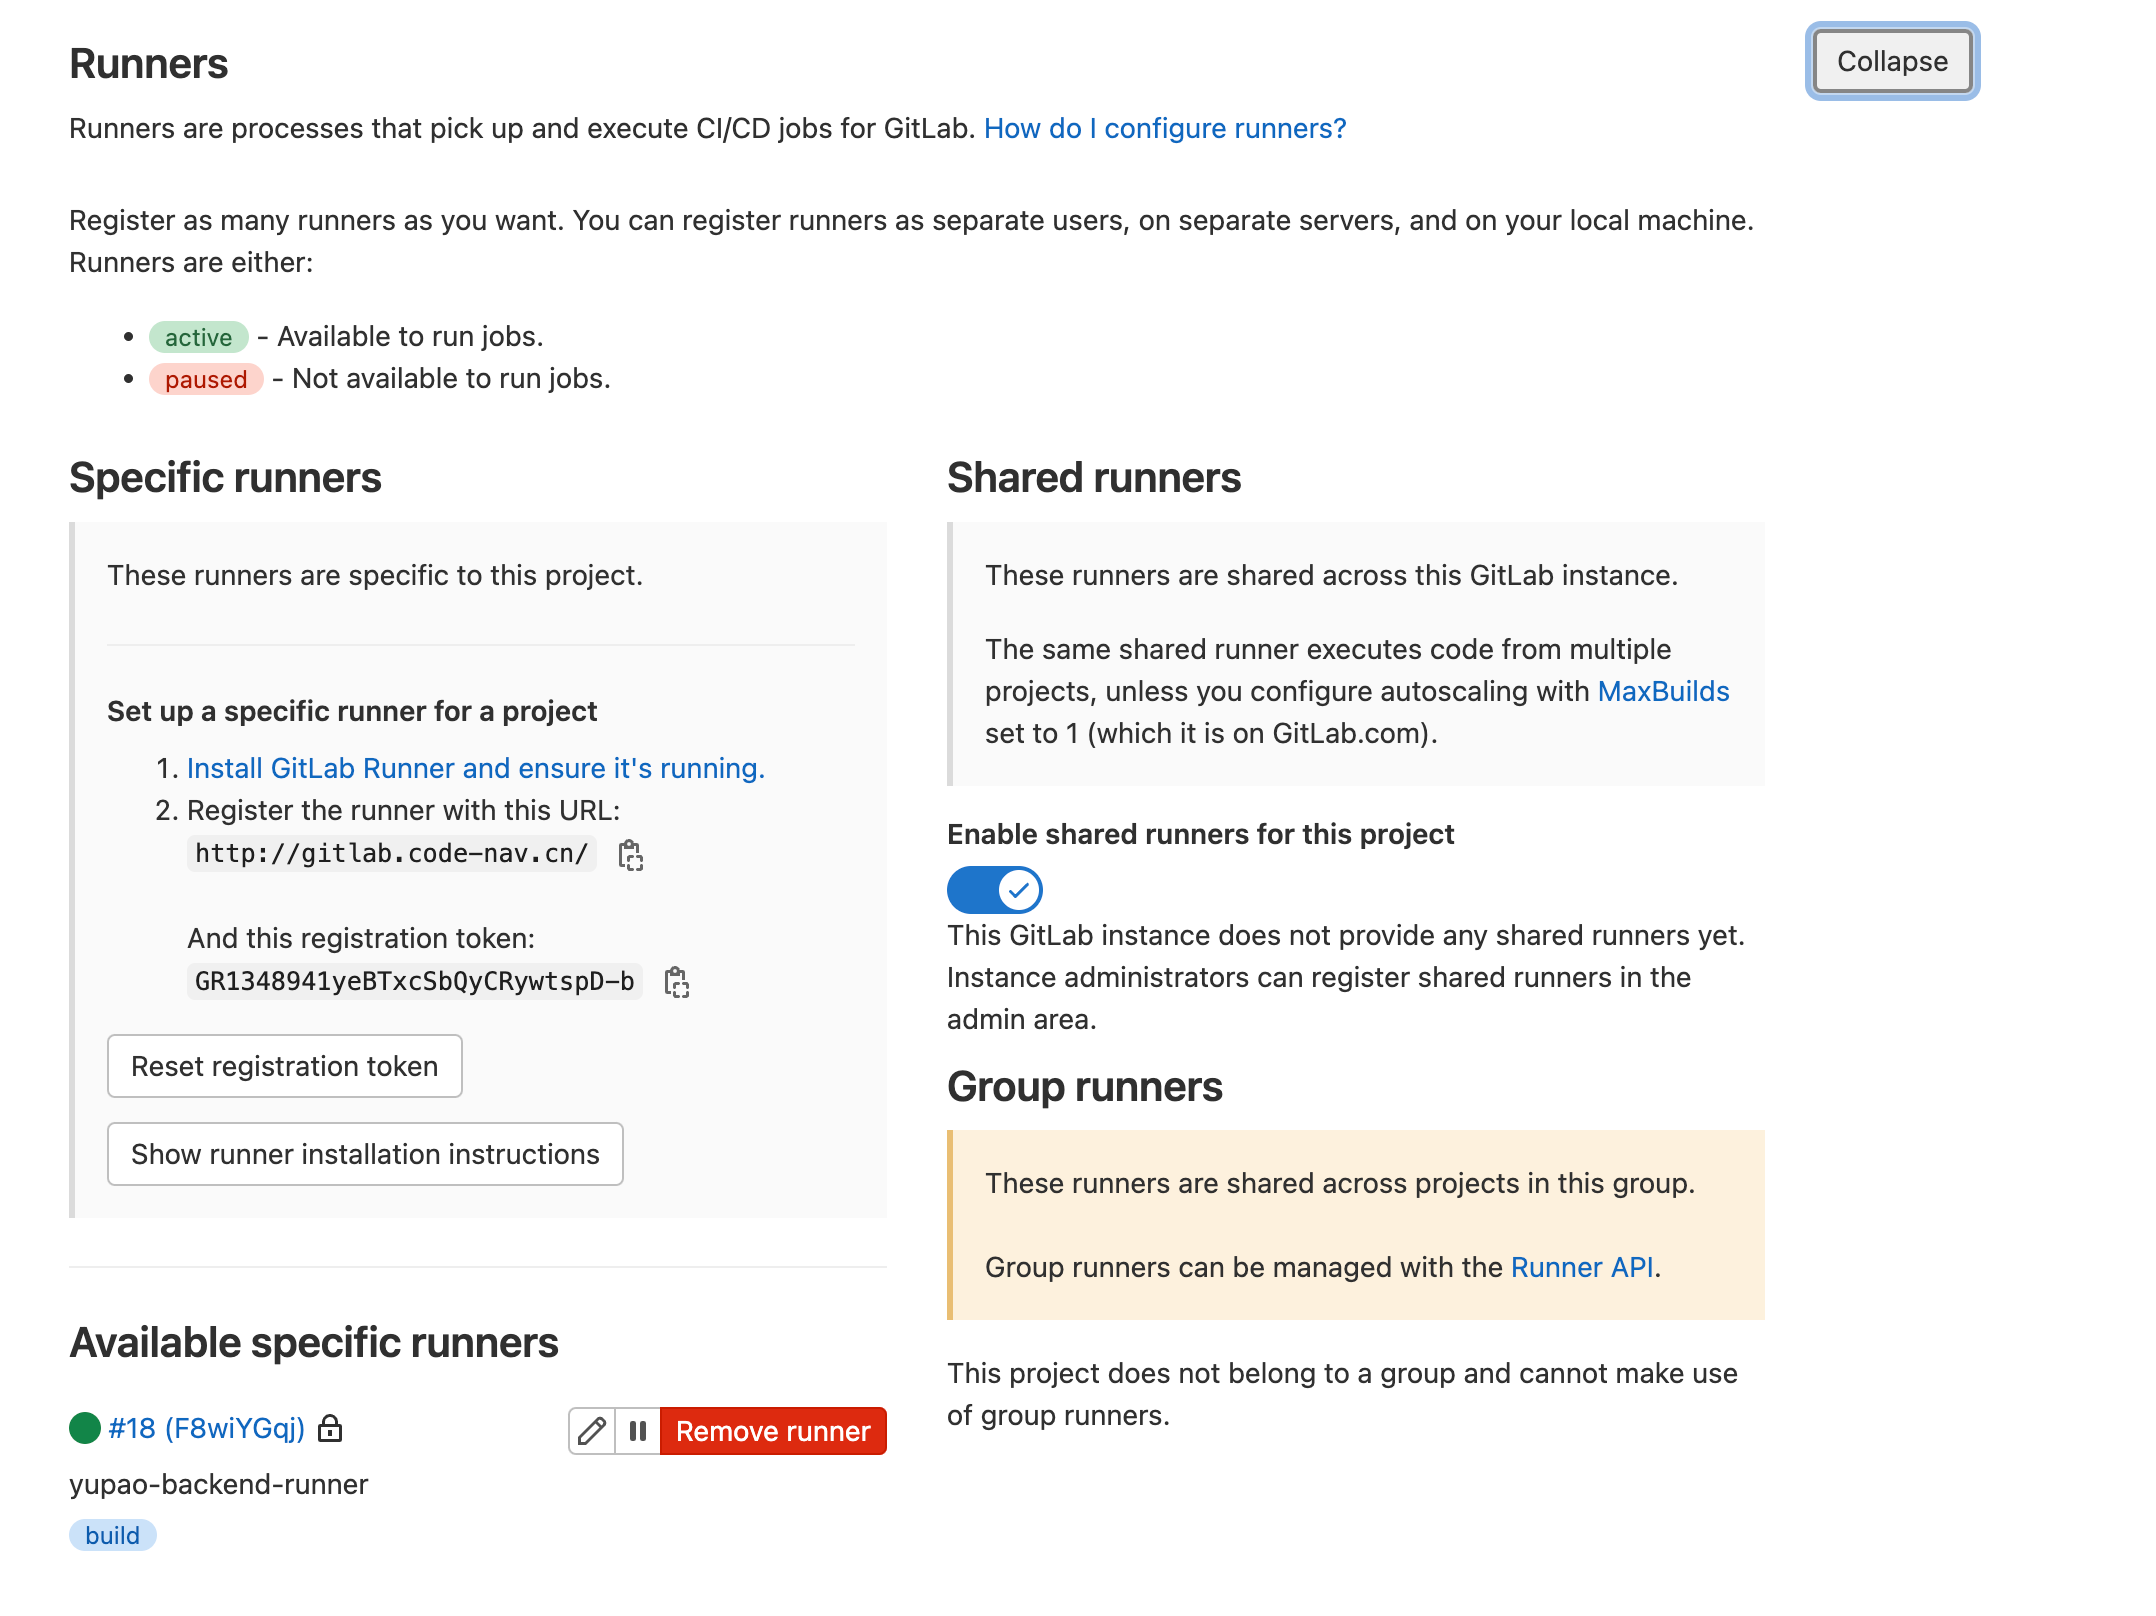
    http://gitlab.code-nav.cn/
    Enter the registration token:
    GR1348941yeBTxcSbQyCRywtspD-b
    Enter a description for the runner:
    [f20fce6332f4]: yupao-backend-runner
    Enter tags for the runner (comma-separated):
    build
    Enter optional maintenance note for the runner:
    Enter an executor: parallels, docker+machine, kubernetes, docker, docker-windows, docker-autoscaler, instance, custom, shell, ssh, virtualbox:
    docker
    Enter the default Docker image (for example, ruby:2.7):
    registry.cn-hangzhou.aliyuncs.com/acs/maven #这是配置了国内的中央仓库地址下载依赖比较快

    image-20241220211421165
    image-20241220211738334

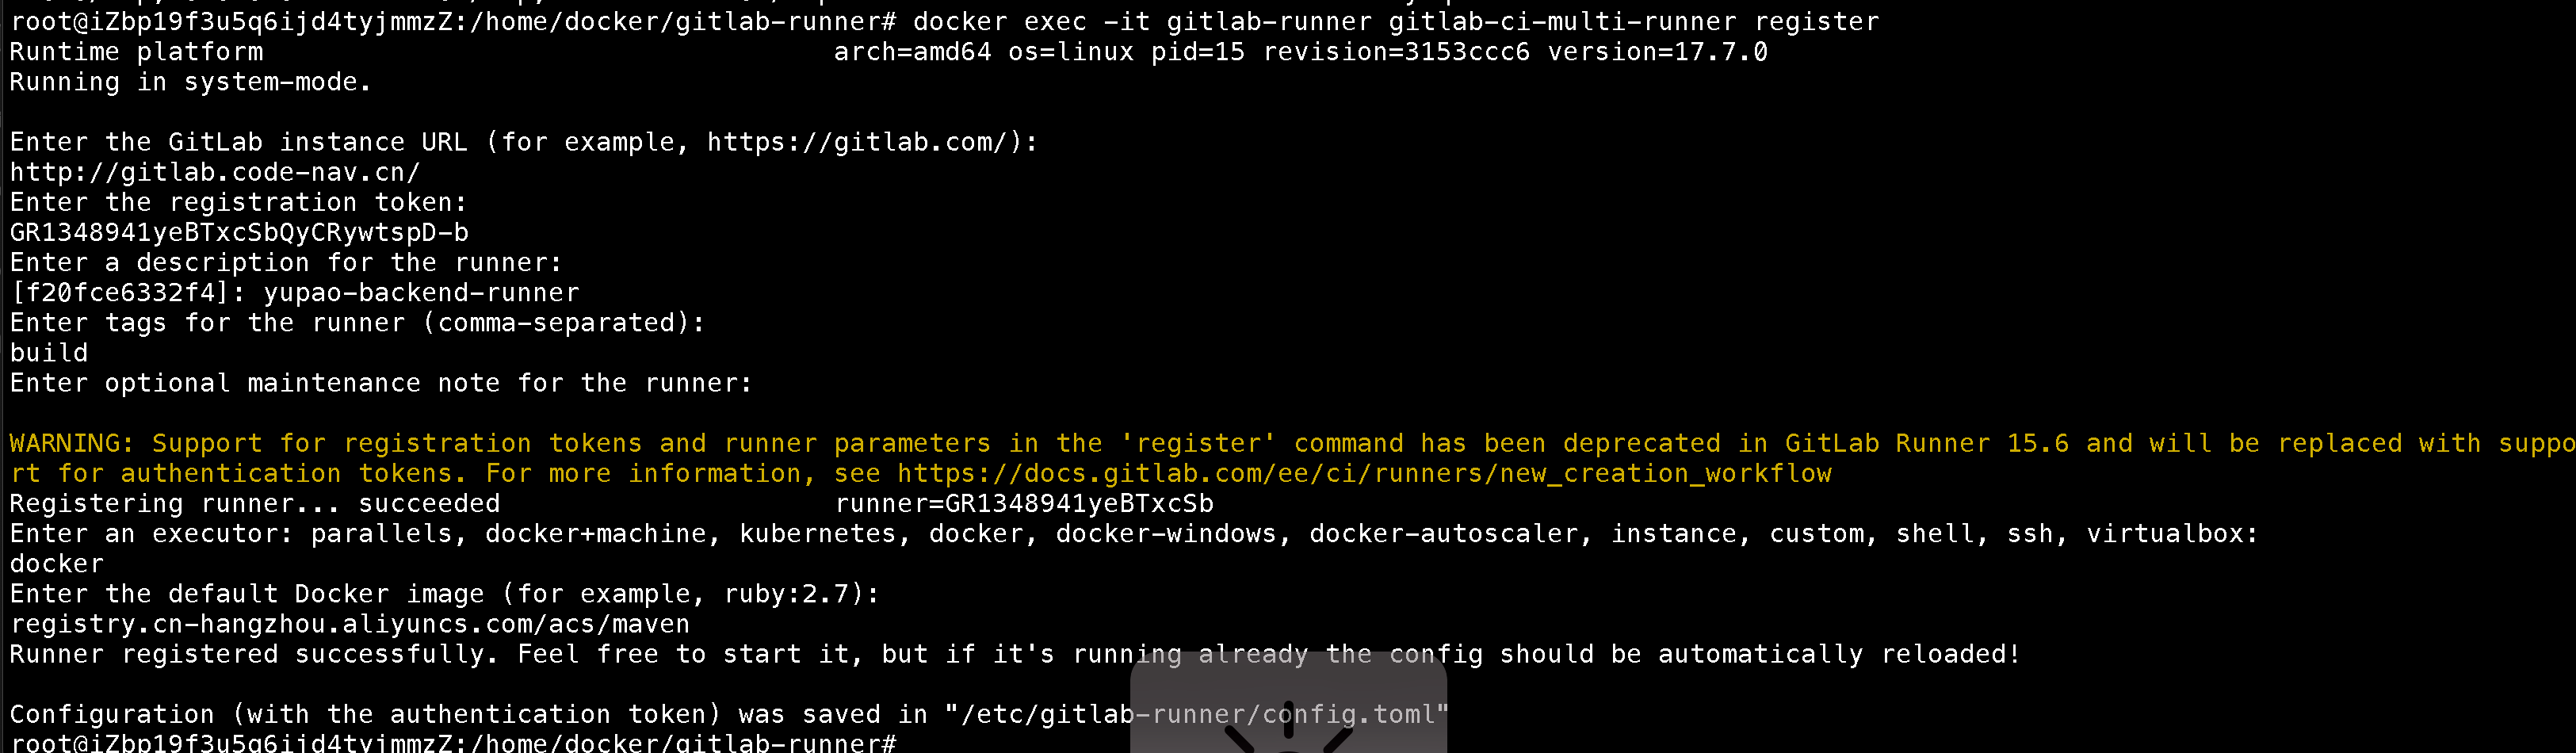
以上步骤可以帮助你使用docker-compose文件部署GitLab Runner。确保你已经安装了Docker和Docker Compose,并且你的系统满足GitLab Runner的运行要求。

有很多搭建个人博客的实现方案,比如:Halo。但是,由于Halo是docker部署的,本人的

选择GitHub和Hexo的原因

1). 免费托管:GitHub Pages 提供免费托管服务,可以直接将Hexo生成的静态网页部署到GitHub上,省去了购买域名和服务器的费用。

2). Hexo 是一个快速、简单且功能强大的静态博客框架。它使用Markdown编写文章,并通过命令行工具生成静态文件,方便管理和发布内容。
Hexo生成的静态文件易于管理,不需要数据库支持,配置和使用起来相对简单,适合没有后端开发经验的用户。

3). 使用GitHub不仅可以管理博客源代码,还能通过Git的版本控制功能追踪修改历史,便于协作和备份。

4). GitHub上有丰富的开源资源和社区支持,Hexo本身也有很多插件和主题可供选择,扩展性强。

5). Hexo生成的静态网站对搜索引擎友好,能够更好地进行SEO优化,从而提高博客的搜索引擎排名。

搭建步骤:

一、准备工作

  1. 安装Node.jsnpm
    Node.js 的版本不能过低,参考Hexo官网

    Node.js 版本限制

    Hexo 版本 最低版本 (Node.js 版本) 最高版本 (Node.js 版本)
    7.0+ 14.0.0 latest
    6.2+ 12.13.0 latest
    6.0+ 12.13.0 18.5.0
    5.0+ 10.13.0 12.0.0
    4.1 - 4.2 8.10 10.0.0
    4.0 8.6 8.10.0
    3.3 - 3.9 6.9 8.0.0
    3.2 - 3.3 0.12 未知
    3.0 - 3.1 0.10 或 iojs 未知
    0.0.1 - 2.8 0.10 未知
  2. 安装git

    • 下载git,根据操作系统的不同选择合适的版本下载。下载链接:git下载
    • Windows操作系统下载之后双击.exe,下一步,选择安装路径,就可以完成安装。
    • macos可以安装Xcode,Xcode默认带了git,没有安装Xcode的可以选择命令行安装,或者安装homebrew,通过homebrew安装git
    • Linux用户可以选择下载压缩包解压的方式安装。

    安装之后,在终端使用命令行查看是否安装成功。

    1
    git version
  3. 准备一个GitHub账号,并创建一个rribons/rribons.github.io仓库,其中rribons是你的用户名。

二、 安装Hexo

  1. 选择电脑的本地仓库文件夹,选择在此处打开Powershell窗口(S)

  2. 依次执行,以下命令,选择一个文件夹初始化Hexo,如果这个文件夹不存在的话,Hexo会创建一个

    1
    2
    3
    $ hexo init <folder>
    $ cd <folder>
    $ npm install
  3. 使用vs_code打开myHexo文件夹,根据Hexo文档修改根目录下的_config.yml

    修改GitHub Pages的url,注意一定按照示例写:https://xxxx.github.io,否则会出现请求css样式404的错误。

    1
    2
    3
    4
    5
    6
    7
    8
    9
    # URL
    ## Set your site url here. For example, if you use GitHub Page, set url as 'https://username.github.io/project'
    url: https://rribons.github.io
    permalink: :year/:month/:day/:title/
    permalink_defaults:
    pretty_urls:
    trailing_index: true # Set to false to remove trailing 'index.html' from permalinks
    trailing_html: true # Set to false to remove trailing '.html' from permalinks

    个人博客部署部分的设置:

    1
    2
    3
    4
    deploy:
    type: git
    repository: https://github.com/rribons/rribons.github.io
    branch: main
    • type :类型
    • repository :Github上仓库的地址
    • branch Github上仓库的分支

    使用 Markdown 嵌入图片
    hexo-renderer-marked 3.1.0 引入了一个新的选项,其允许你无需使用 asset_img 标签插件就可以在 markdown 中嵌入图片。如需启用:_config.yml

    1
    2
    3
    4
    post_asset_folder: true
    marked:
    prependRoot: true
    postAsset: true

    启用后,资源图片将会被自动解析为其对应文章的路径。 例如: image.jpg 位置为 /2020/01/02/foo/image.jpg ,这表示它是 /2020/01/02/foo/ 文章的一张资源图片,![](image.jpg)将会被解析为

  4. 修改完配置文件后,在个人博客项目的文件夹下面,打开git bash,执行以下命令本地测试是否部署成功。

    1
    2
    3
    4
    5
    $ npm install hexo-deployer-git --save # 不执行的话,最后部署到GitHub不会成功
    $ hexo generate # 生成静态文件。
    $ hexo server # 启动服务器。 默认情况下,访问网址为: http://localhost:4000/
    $ hexo deploy # 部署你的网站。
    $ hexo clean # 清除缓存文件 (db.json) 和已生成的静态文件 (public)。

三、创建第一个博客

  1. 开始第一个博客
    1
    $ hexo new "Hexo + Github搭建个人博客"
    命令执行之后,会在source目录下创建一个.md的文件,使用vs_code或者其他markdown编辑软件编写博客。
  2. 编写完成之后,清除缓存,生成静态文件,就可以部署新的博客文章到GitHub上了。
    1
    2
    3
    4
    $ hexo clean # 清除缓存文件 (db.json) 和已生成的静态文件 (public)。
    $ hexo generate # 生成静态文件。
    $ hexo server # 启动服务器。 默认情况下,访问网址为: http://localhost:4000/ 本地预览
    $ hexo deploy # 部署你的网站。

四、添加自定义域名

虽然说GitHub Pages可以白嫖一个二级域名,但如果不想域名太长的的话可以xx云上购买一个域名。
打开GitHub上自己创建的rribons.github.io仓库,选择Settings –> 左侧Pages –> Custom domain下边的文本框填入自己xx云买的的域名,选择save。等待DNS校验通过之后就可以通过域名访问了。

Welcome to Hexo! This is your very first post. Check documentation for more info. If you get any problems when using Hexo, you can find the answer in troubleshooting or you can ask me on GitHub.

Quick Start

Create a new post

1
$ hexo new "My New Post"

More info: Writing

Run server

1
$ hexo server

More info: Server

Generate static files

1
$ hexo generate

More info: Generating

Deploy to remote sites

1
$ hexo deploy

More info: Deployment

0%